
Yes! you can remove the Snapchat filter from a picture you take inside the app and also from the saved images on your phone.
New to the Snapchat? Or don’t know how to do it. No worries! You don’t need to hassle around anywhere. We will tell you simple steps on how to remove the Snapchat filter either from saved images or in-app picture.
So, without wasting much time, let’s dive into the Snapchat app.
How to remove Snapchat filter?
Note: When you take a picture in Snapchat and add any filter, you cannot directly go back to the original shot, which you have made earlier before adding the filter. So, if you want to know how to remove the Snapchat filter, first, you have to save the photo with filters on your device. After saving the picture to your device, now you can use Snapchat’s in-built tool ‘Magic Eraser’ for removing the filter.
Let’s see how we can do this:
How to Remove Snapchat filters from any picture?
The above video is the tutorial example of removing Snapchat filters from saved images. Watch this video and follow these simple steps to remove the Snap filter from your pictures using the Magic Eraser tool.
Step 1 | Once you have taken the picture, added the filter, and now want to remove it, first save the image to your device.
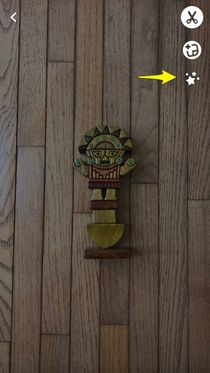
Step 2 | After the picture is saved, you can now see the ‘Magic Eraser’ tool in the image below.
Step 3 | Click the button.
Step 4 | Now, use the tool as a brush to apply on the colorful objects that you want to remove.
Step 5 | Snapchat will then automatically detect the areas you have brushed and will edit the image as you wish.
See how easy it was that! Now you can try yourself on your Snapchat app. Remember, don’t forget to save the image first else you will not be able to use the Magic Eraser tool as it is applicable only after you save the image on your device.
How to remove Snapchat Filter from saved images using the app?
This is another case where any user has already saved the images and then want to edit any specific picture to take back to its original form. Here are the simple steps for this process to follow.
Step 1 | Open Snapchat app and navigate to the ‘saved snaps’ section.
Step 2 | Now, search for the picture that you want to edit or remove filters from.
Step 3 | Select that image for a few seconds, and a new popup will appear with different options.
Step 4 | Click on the ‘edit’ option from the popup, and from here, you can change, edit, or remove filters from the picture.
By using this ‘edit’ option, you can quickly transform your image back to its original form or even can change and apply new filters for a fresh look. That’s how people do it, and most of us don’t also have an idea for such. Well, its not a lame thing, but as of now, you are aware, and you can use this to make your Snap more fascinating and exciting.


I would like to try this app and if it work I will tell everyone to use it
Idk if I’m doing it wrong but none of that works
Comments are closed.